Kornia 0.6 : Tutorials (中級) : 顔検出とぼかし (翻訳/解説)
翻訳 : (株)クラスキャット セールスインフォメーション
作成日時 : 10/29/2022 (v0.6.8)
* 本ページは、Kornia Tutorials の以下のドキュメントを翻訳した上で適宜、補足説明したものです:
- Intermediate : Face Detection and blurring
* サンプルコードの動作確認はしておりますが、必要な場合には適宜、追加改変しています。
* ご自由にリンクを張って頂いてかまいませんが、sales-info@classcat.com までご一報いただけると嬉しいです。
クラスキャット 人工知能 研究開発支援サービス
◆ クラスキャット は人工知能・テレワークに関する各種サービスを提供しています。お気軽にご相談ください :

- 人工知能研究開発支援
- 人工知能研修サービス(経営者層向けオンサイト研修)
- テクニカルコンサルティングサービス
- 実証実験(プロトタイプ構築)
- アプリケーションへの実装
- 人工知能研修サービス
- PoC(概念実証)を失敗させないための支援
◆ 人工知能とビジネスをテーマに WEB セミナーを定期的に開催しています。スケジュール。
- お住まいの地域に関係なく Web ブラウザからご参加頂けます。事前登録 が必要ですのでご注意ください。
◆ お問合せ : 本件に関するお問い合わせ先は下記までお願いいたします。
- 株式会社クラスキャット セールス・マーケティング本部 セールス・インフォメーション
- sales-info@classcat.com ; Web: www.classcat.com ; ClassCatJP
顔検出とぼかし
このチュートリアルでは以下を使用する方法を示します :
- CPU/GPU での 顔検出 API
- 検出された画像をぼかす
%%capture
!pip install git+https://github.com/kornia/kornia
%%capture
!wget -O image.jpg https://www.reader.gr/sites/default/files/styles/schema_cover_1_1/public/2021-09/squid-game-3.jpg
必要なライブラリをインポートする :
import cv2
import numpy as np
import matplotlib.pyplot as plt

import torch
import kornia as K
from kornia.contrib import FaceDetector, FaceDetectorResult

# select the device and type
device = torch.device('cpu')  # use 'cuda:0'
dtype = torch.float32
/home/docs/checkouts/readthedocs.org/user_builds/kornia-tutorials/envs/latest/lib/python3.7/site-packages/tqdm/auto.py:22: TqdmWarning: IProgress not found. Please update jupyter and ipywidgets. See https://ipywidgets.readthedocs.io/en/stable/user_install.html
  from .autonotebook import tqdm as notebook_tqdm
画像を読み torch.Tensor に変換する :
# load the image and scale (if needed)
img_raw = cv2.imread('image.jpg', cv2.IMREAD_COLOR)

# preprocess
img = K.image_to_tensor(img_raw, keepdim=False).to(device, dtype)
img = K.color.bgr_to_rgb(img)

img_vis = K.tensor_to_image(img.byte().clone())  # to later visualise
plt.figure(figsize=(8, 8))
plt.imshow(K.tensor_to_image(img.byte()))
plt.axis('off')
(-0.5, 1199.5, 1199.5, -0.5)

FaceDetector オブジェクトを作成して画像に適用する :
# create the detector and find the faces !
face_detection = FaceDetector().to(device, dtype)

with torch.no_grad():
    dets = face_detection(img)

# to decode later the detections
dets = [FaceDetectorResult(o) for o in dets]
Downloading: "https://github.com/kornia/data/raw/main/yunet_final.pth" to /home/docs/.cache/torch/hub/checkpoints/yunet_final.pth
元の画像から顔をクロップして gaussian_blurd2d 演算子を使用してぼかしを適用する関数を作成します。
代わりに、kornia.filters で他のぼかし演算子を調べてください。
# blurring paramters
k: int = 21     # kernel_size
s: float = 35.  # sigma

def apply_blur_face(img: torch.Tensor, img_vis: np.ndarray, det: FaceDetectorResult):
    # crop the face
    x1, y1 = det.xmin.int(), det.ymin.int()
    x2, y2 = det.xmax.int(), det.ymax.int()
    roi = img[..., y1:y2, x1:x2]

    # apply blurring and put back to the visualisation image
    roi = K.filters.gaussian_blur2d(roi, (k, k), (s, s))
    roi = K.color.rgb_to_bgr(roi)
    img_vis[y1:y2, x1:x2] = K.tensor_to_image(roi)
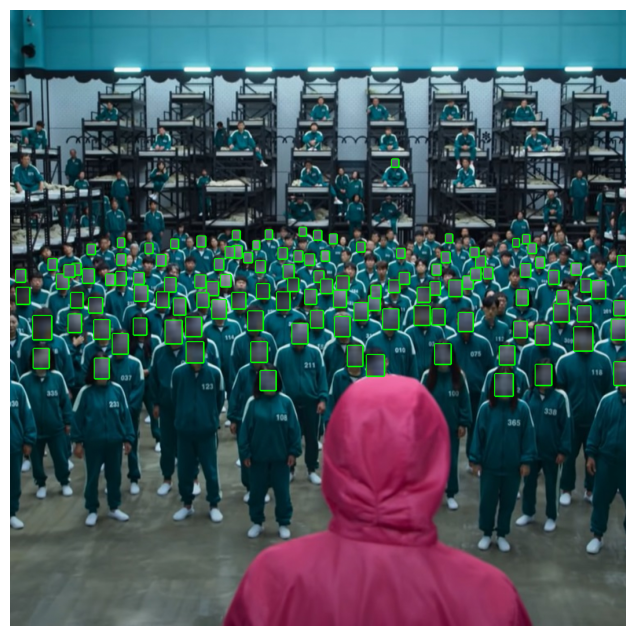
検出を描画して画像をセーブ/可視化しましょう :
for b in dets:
    if b.score < 0.6:  # skip detections with lower score
        continue

    # draw face bounding box around each detected face
    x1, y1 = b.top_left.int().tolist()
    x2, y2 = b.bottom_right.int().tolist()
    img_vis = cv2.rectangle(img_vis, (x1, y1), (x2, y2), (0, 255, 0), 4)

    # blur the detected faces
    apply_blur_face(img, img_vis, b)

plt.figure(figsize=(8, 8))
plt.imshow(img_vis)
plt.axis('off')

# save and show image
cv2.imwrite('img_out.jpg', img_vis)
True
以上