CrewAI も 1.0 Alpha のプレリリースが公開されています。
クイックスタートでは、CrewAI を使用して最初の AI エージェントを数分で構築します。
CrewAI 1.0 alpha : Get Started : クイックスタート
作成 : クラスキャット・セールスインフォメーション
作成日時 : 10/07/2025
バージョン : 1.0.0a3 (0.201.1)
* 本記事は github.com/crewAIInc/crewAI の以下のページを独自に翻訳した上で、補足説明を加えてまとめ直しています。スニペットはできる限り日本語を使用しています :
* サンプルコードの動作確認はしておりますが、必要な場合には適宜、追加改変しています。
* ご自由にリンクを張って頂いてかまいませんが、sales-info@classcat.com までご一報いただけると嬉しいです。

◆ お問合せ : 下記までお願いします。
- クラスキャット セールス・インフォメーション
- sales-info@classcat.com
- ClassCatJP
CrewAI 1.0 α : Get Started : クイックスタート
CrewAI を使用して 5 分以内に最初の AI エージェントを構築します。
最初の CrewAI エージェントの構築
単純な crew を作成しましょう、これは指定されたトピックやサブジェクトについて最新の AI 開発の調査やレポートに役立ちます。
先に進む前に、CrewAI のインストールを完了していることを確認してください。まだインストールしていない場合には、インストールガイド に従ってインストールできます。
Follow the steps below to get Crewing! 🚣♂️
- crew の作成
ターミナルで以下のコマンドを実行することで新しい crew プロジェクトを作成します。これは crew の基本的な構造を含む latest-ai-development という名前の新しいディレクトリを作成します。crewai create crew latest-ai-development以下のようなプロジェクトが作成されます :
latest_ai_development ├── .env ├── .gitignore ├── knowledge │ └── user_preference.txt ├── pyproject.toml ├── README.md ├── src │ └── latest_ai_development │ ├── __init__.py │ ├── config │ │ ├── agents.yaml │ │ └── tasks.yaml │ ├── crew.py │ ├── main.py │ └── tools │ ├── __init__.py │ └── custom_tool.py └── tests - 新しい crew プロジェクトに移動する
cd latest_ai_development - `agents.yaml` ファイルの変更
Info : ユースケースに合わせるために必要に応じてエージェントを変更したり、そのままプロジェクトにコピー&ペーストすることができます。{topic} のような agents.yaml と tasks.yaml ファイルで変数展開される任意の変数は main.py ファイルの変数の値で置き換えられます。
agents.yaml
# src/latest_ai_development/config/agents.yaml researcher: role: > {topic} 上級データ研究員 goal: > {topic} の最先端の動向を明らかにする backstory: > あなたは {topic} の最新の動向を見抜く洞察力を持つ、熟練の研究者です。 最も関連性の高い情報を的確に見つけ出し、明確かつ簡潔にまとめる能力で知られています。 reporting_analyst: role: > {topic} レポート作成アナリスト goal: > {topic} のデータ分析と調査結果に基づいて詳細なレポートを作成します backstory: > あなたは細部にまで鋭い観察力を持つ、綿密なアナリストです。 複雑なデータを明確で簡潔なレポートに変換し、他の人がその情報を簡単に理解し、それに基づいて行動に移せるようにする能力で知られています。 - `tasks.yaml` ファイルの変更
tasks.yaml
# src/latest_ai_development/config/tasks.yaml research_task: description: > {topic} について徹底的に調査してください。 現在の年は2025年として、興味深く関連性のある情報を確実に見つけてください。 expected_output: > {topic} に関する最も関連性の高い情報を 10 個の箇条書きでまとめたリスト agent: researcher reporting_task: description: > 得られたコンテキストをレビューし、各トピックをレポートの完全なセクションに拡張します。 レポートが詳細で、関連するすべての情報が含まれていることを確実にしてください。 expected_output: > 主要なトピックを網羅し、それぞれ完全な情報セクションを備えた本格的なレポート。 '```' を除いたマークダウン形式でフォーマットされています。 agent: reporting_analyst output_file: report.md - `crew.py` ファイルの変更
crew.py
# src/latest_ai_development/crew.py from crewai import Agent, Crew, Process, Task from crewai.project import CrewBase, agent, crew, task from crewai_tools import SerperDevTool from crewai.agents.agent_builder.base_agent import BaseAgent from typing import List @CrewBase class LatestAiDevelopmentCrew(): """LatestAiDevelopment crew""" agents: List[BaseAgent] tasks: List[Task] @agent def researcher(self) -> Agent: return Agent( config=self.agents_config['researcher'], # type: ignore[index] verbose=True, tools=[SerperDevTool()] ) @agent def reporting_analyst(self) -> Agent: return Agent( config=self.agents_config['reporting_analyst'], # type: ignore[index] verbose=True ) @task def research_task(self) -> Task: return Task( config=self.tasks_config['research_task'], # type: ignore[index] ) @task def reporting_task(self) -> Task: return Task( config=self.tasks_config['reporting_task'], # type: ignore[index] output_file='output/report.md' # This is the file that will be contain the final report. ) @crew def crew(self) -> Crew: """Creates the LatestAiDevelopment crew""" return Crew( agents=self.agents, # Automatically created by the @agent decorator tasks=self.tasks, # Automatically created by the @task decorator process=Process.sequential, verbose=True, ) - [オプション] before / after crew 関数の追加
crew.py
# src/latest_ai_development/crew.py from crewai import Agent, Crew, Process, Task from crewai.project import CrewBase, agent, crew, task, before_kickoff, after_kickoff from crewai_tools import SerperDevTool @CrewBase class LatestAiDevelopmentCrew(): """LatestAiDevelopment crew""" @before_kickoff def before_kickoff_function(self, inputs): print(f"Before kickoff function with inputs: {inputs}") return inputs # You can return the inputs or modify them as needed @after_kickoff def after_kickoff_function(self, result): print(f"After kickoff function with result: {result}") return result # You can return the result or modify it as needed # ... remaining code - カスタム入力を crew に自由に渡してください
例えば、topic 入力を crew に渡して、調査とレポートをカスタマイズできます。
main.py
#!/usr/bin/env python # src/latest_ai_development/main.py import sys from latest_ai_development.crew import LatestAiDevelopmentCrew def run(): """ Run the crew. """ inputs = { 'topic': 'AI Agents' } LatestAiDevelopmentCrew().crew().kickoff(inputs=inputs) - 環境変数の設定
crew を実行する前に、.env ファイルに環境変数として以下のキーセットがあることを確認してください :
- Serper.dev API キー: SERPER_API_KEY=YOUR_KEY_HERE
- API キーのような、選択したモデル用の構成設定。See the LLM setup guide to learn how to configure models from any provider.
- 依存関係をロックしてインストール
- CLI コマンドを使用して、依存関係をロックしてインストールします :
crewai install - インストールしたい追加のパッケージがある場合、次を実行することで対応できます :
uv add
- CLI コマンドを使用して、依存関係をロックしてインストールします :
- crew の実行
- crew を実行するには、プロジェクトのルートで以下のコマンドを実行します :
crewai run - 最終レポートの表示
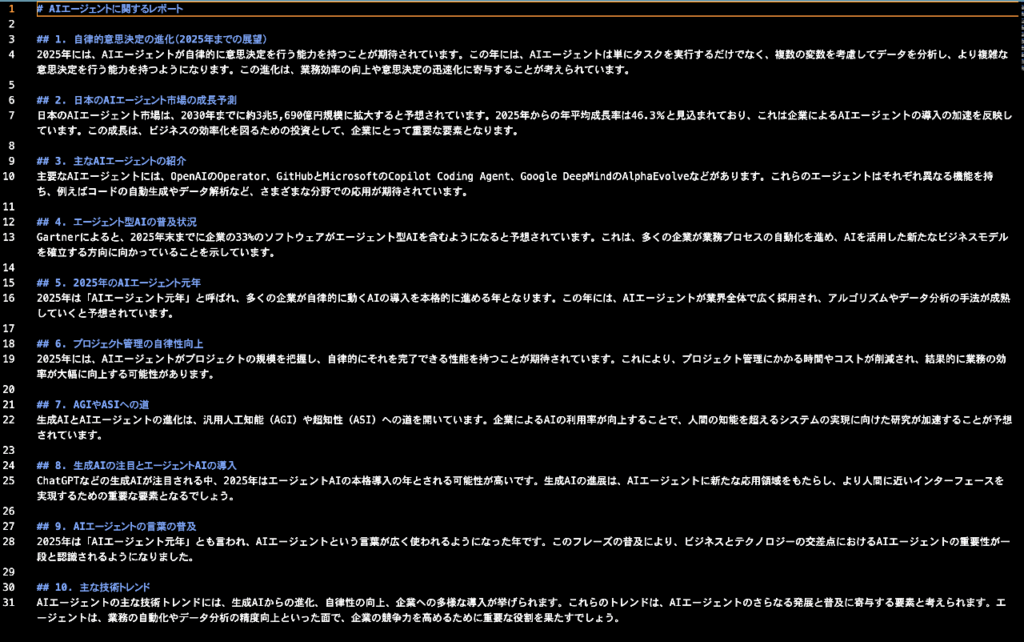
コンソールに出力が表示され、最終レポートを含む report.md ファイルがプロジェクトのルート内に作成されます。Here’s an example of what the report should look like:
output/report.md
以上