Kornia 0.6 : Tutorials (基本) : 連結コンポーネント・アルゴリズム (翻訳/解説)
翻訳 : (株)クラスキャット セールスインフォメーション
作成日時 : 10/26/2022 (v0.6.8)
* 本ページは、Kornia Tutorials の以下のドキュメントを翻訳した上で適宜、補足説明したものです:
- Basic : Connected Components Algorithm
* サンプルコードの動作確認はしておりますが、必要な場合には適宜、追加改変しています。
* ご自由にリンクを張って頂いてかまいませんが、sales-info@classcat.com までご一報いただけると嬉しいです。
クラスキャット 人工知能 研究開発支援サービス
◆ クラスキャット は人工知能・テレワークに関する各種サービスを提供しています。お気軽にご相談ください :

- 人工知能研究開発支援
- 人工知能研修サービス(経営者層向けオンサイト研修)
- テクニカルコンサルティングサービス
- 実証実験(プロトタイプ構築)
- アプリケーションへの実装
- 人工知能研修サービス
- PoC(概念実証)を失敗させないための支援
◆ 人工知能とビジネスをテーマに WEB セミナーを定期的に開催しています。スケジュール。
- お住まいの地域に関係なく Web ブラウザからご参加頂けます。事前登録 が必要ですのでご注意ください。
◆ お問合せ : 本件に関するお問い合わせ先は下記までお願いいたします。
- 株式会社クラスキャット セールス・マーケティング本部 セールス・インフォメーション
- sales-info@classcat.com ; Web: www.classcat.com ; ClassCatJP
Kornia 0.6 : Tutorials (基本) : 連結コンポーネント・アルゴリズム
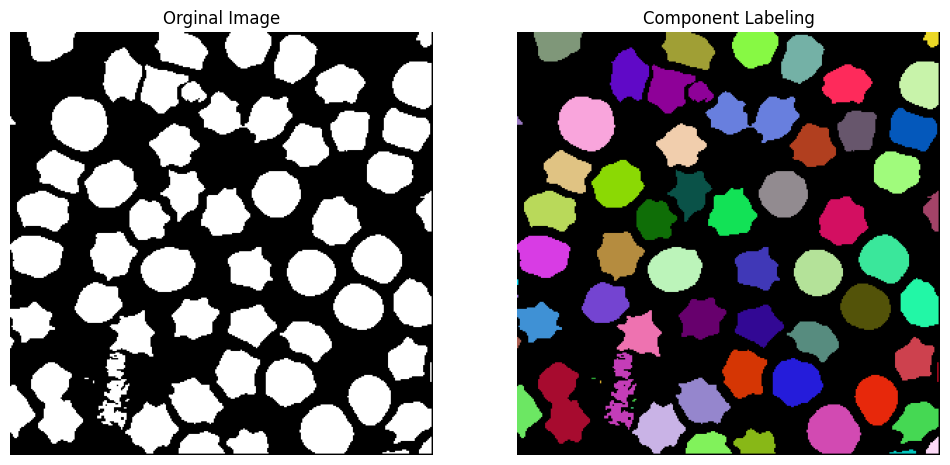
このチュートリアルでは、連結コンポーネント・ラベリング (CCL) と呼ばれる古典的なコンピュータビジョン・テクニックの kornia 実装を使用して画像の小さいオブジェクトを分割する方法を学習していきます。
%%capture
!pip install kornia
%%capture
!wget https://github.com/kornia/data/raw/main/cells_binary.png
from typing import Dict, Tuple

import matplotlib.pyplot as plt
import torch
import torch.nn.functional as F
import cv2
import numpy as np
import kornia as K
/home/docs/checkouts/readthedocs.org/user_builds/kornia-tutorials/envs/latest/lib/python3.7/site-packages/tqdm/auto.py:22: TqdmWarning: IProgress not found. Please update jupyter and ipywidgets. See https://ipywidgets.readthedocs.io/en/stable/user_install.html
  from .autonotebook import tqdm as notebook_tqdm
セグメンテーションを正しく可視化するユティリティ関数を定義します :
def create_random_labels_map(classes: int) -> Dict[int, Tuple[int, int, int]]:
    labels_map: Dict[int, Tuple[int, int, int]] = {}
    for i in classes:
        labels_map[i] = torch.randint(0, 255, (3, ))
    labels_map[0] = torch.zeros(3)
    return labels_map

def labels_to_image(img_labels: torch.Tensor, labels_map: Dict[int, Tuple[int, int, int]]) -> torch.Tensor:
    """Function that given an image with labels ids and their pixels intrensity mapping, creates a RGB
    representation for visualisation purposes."""
    assert len(img_labels.shape) == 2, img_labels.shape
    H, W = img_labels.shape
    out = torch.empty(3, H, W, dtype=torch.uint8)
    for label_id, label_val in labels_map.items():
        mask = (img_labels == label_id)
        for i in range(3):
            out[i].masked_fill_(mask, label_val[i])
    return out

def show_components(img, labels):
    color_ids = torch.unique(labels)
    labels_map = create_random_labels_map(color_ids)
    labels_img = labels_to_image(labels, labels_map)

    fig, (ax1, ax2) = plt.subplots(1, 2, figsize=(12,12))

    # Showing Original Image
    ax1.imshow(cv2.cvtColor(img, cv2.COLOR_BGR2RGB))
    ax1.axis("off")
    ax1.set_title("Orginal Image")

    #Showing Image after Component Labeling
    ax2.imshow(labels_img.permute(1,2,0).squeeze().numpy())
    ax2.axis('off')
    ax2.set_title("Component Labeling")
OpenCV を使用して画像をロードして、それが [0, 1] の範囲内の浮動小数点画像であることを確実にします。
img: np.ndarray = cv2.imread("cells_binary.png", cv2.IMREAD_GRAYSCALE)
入力画像を torch.tensor にキャストします :
img_t: torch.Tensor = K.utils.image_to_tensor(img)  # CxHxW
img_t = img_t[None,...].float() / 255.
print(img_t.shape)
torch.Size([1, 1, 602, 602])
kornia.contrib.connected_components 機能を使用して連結コンポーネント・ラベリングアルゴリズムを適用します。num_iterations パラメータは (解に収束するまでに終了する) アルゴリズムのイテレーションの総数を制御します。
labels_out = K.contrib.connected_components(img_t, num_iterations=150)
print(labels_out.shape)
torch.Size([1, 1, 602, 602])
show_components(img_t.numpy().squeeze(), labels_out.squeeze())
We can also explore the labels
print(torch.unique(labels_out))
tensor([     0.,  13235.,  24739.,  31039.,  32177.,  44349.,  59745.,  61289.,
         66209.,  69449.,  78869.,  94867., 101849., 102217., 102319., 115227.,
        115407., 137951., 138405., 150047., 158715., 162179., 170433., 170965.,
        174279., 177785., 182867., 210145., 212647., 215451., 216119., 221291.,
        222367., 226183., 226955., 248757., 252823., 255153., 263337., 265505.,
        270299., 270649., 277725., 282775., 296897., 298545., 299793., 300517.,
        313961., 316217., 321259., 322235., 335599., 337037., 340289., 347363.,
        352235., 352721., 360801., 360903., 360965., 361073., 361165., 361197.])
以上