Kornia 0.6 : Tutorials (基本) : Canny 演算子によるエッジの取得 (翻訳/解説)
翻訳 : (株)クラスキャット セールスインフォメーション
作成日時 : 10/25/2022 (v0.6.8)
* 本ページは、Kornia Tutorials の以下のドキュメントを翻訳した上で適宜、補足説明したものです:
* サンプルコードの動作確認はしておりますが、必要な場合には適宜、追加改変しています。
* ご自由にリンクを張って頂いてかまいませんが、sales-info@classcat.com までご一報いただけると嬉しいです。
クラスキャット 人工知能 研究開発支援サービス
◆ クラスキャット は人工知能・テレワークに関する各種サービスを提供しています。お気軽にご相談ください :

- 人工知能研究開発支援
- 人工知能研修サービス(経営者層向けオンサイト研修)
- テクニカルコンサルティングサービス
- 実証実験(プロトタイプ構築)
- アプリケーションへの実装
- 人工知能研修サービス
- PoC(概念実証)を失敗させないための支援
◆ 人工知能とビジネスをテーマに WEB セミナーを定期的に開催しています。スケジュール。
- お住まいの地域に関係なく Web ブラウザからご参加頂けます。事前登録 が必要ですのでご注意ください。
◆ お問合せ : 本件に関するお問い合わせ先は下記までお願いいたします。
- 株式会社クラスキャット セールス・マーケティング本部 セールス・インフォメーション
- sales-info@classcat.com ; Web: www.classcat.com ; ClassCatJP
Kornia 0.6 : Tutorials (基本) : Canny 演算子によるエッジの取得
このチュートリアルでは、Kornia を使用して典型的な canny エッジ検出 を簡単に適用できる方法を示します。
Enjoy the example!
準備
まず Kornia をインストールします。
%%capture
%matplotlib inline
!pip install git+https://github.com/kornia/kornia
import kornia
kornia.__version__
/home/docs/checkouts/readthedocs.org/user_builds/kornia-tutorials/envs/latest/lib/python3.7/site-packages/tqdm/auto.py:22: TqdmWarning: IProgress not found. Please update jupyter and ipywidgets. See https://ipywidgets.readthedocs.io/en/stable/user_install.html
  from .autonotebook import tqdm as notebook_tqdm
'0.6.8-dev'
そしてサンプル画像をダウンロードします。
%%capture
!wget -O paranoia_agent.jpg https://ih1.redbubble.net/image.675644909.6235/flat,800x800,075,f.u3.jpg
例題
最初に必要なライブラリをインポートしてデータをロードします。
import torch
import kornia
import cv2
import numpy as np

import matplotlib.pyplot as plt

# read the image with OpenCV
img: np.ndarray = cv2.imread('./paranoia_agent.jpg')
img = cv2.cvtColor(img, cv2.COLOR_BGR2RGB)

# convert to torch tensor
data: torch.tensor = kornia.image_to_tensor(img, keepdim=False)/255.  # BxCxHxW

plt.axis('off')
plt.imshow(img)
plt.show()

フィルタを適用するため、Canny 演算子オブジェクトを作成してそれをデータに適用します。それは大きさ (= magnitude) とヒステリシス処理 (= hysteresis process) 後のエッジを提供します。エッジは微分可能ではない二値画像であることに注意してください!
# create the operator
canny = kornia.filters.Canny()

# blur the image
x_magnitude, x_canny = canny(data.float())
That’s it! ソース画像と、大きさとエッジからの結果を比較することができます。
# convert back to numpy
img_magnitude: np.ndarray = kornia.tensor_to_image(x_magnitude.byte())
img_canny: np.ndarray = kornia.tensor_to_image(x_canny.byte())

# Create the plot
fig, axs = plt.subplots(1, 3, figsize=(16,16))
axs = axs.ravel()

axs[0].axis('off')
axs[0].set_title('image source')
axs[0].imshow(img)

axs[1].axis('off')
axs[1].set_title('canny magnitude')
axs[1].imshow(img_magnitude, cmap='Greys')

axs[2].axis('off')
axs[2].set_title('canny edges')
axs[2].imshow(img_canny, cmap='Greys')

plt.show()

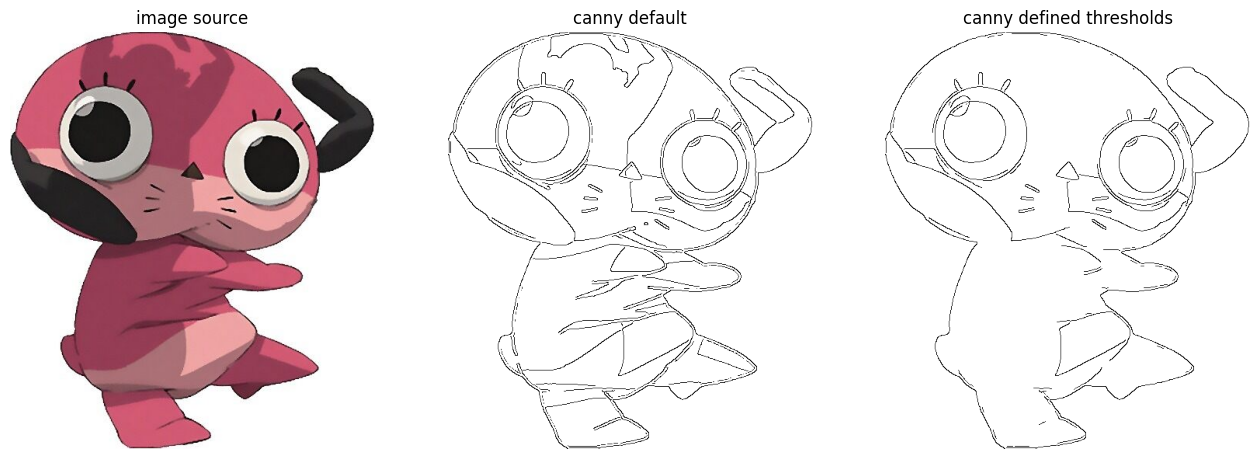
最終的な結果は依然として、大きさが非常に小さいエッジをリカバーしていることに注意してください。閾値を大きくして最終的なエッジを比較してみましょう。
# create the operator
canny = kornia.filters.Canny(low_threshold=0.4, high_threshold=0.5)

# blur the image
_, x_canny_threshold = canny(data.float())
import torch.nn.functional as F
# convert back to numpy
img_canny_threshold: np.ndarray = kornia.tensor_to_image(x_canny_threshold.byte())

# Create the plot
fig, axs = plt.subplots(1, 3, figsize=(16,16))
axs = axs.ravel()

axs[0].axis('off')
axs[0].set_title('image source')
axs[0].imshow(img)

axs[1].axis('off')
axs[1].set_title('canny default')
axs[1].imshow(img_canny, cmap='Greys')

axs[2].axis('off')
axs[2].set_title('canny defined thresholds')
axs[2].imshow(img_canny_threshold, cmap='Greys')

plt.show()
以上