PyTorch 1.8 チュートリアル : PyTorch の学習 : 基本 – Dataset と DataLoader (翻訳/解説)
翻訳 : (株)クラスキャット セールスインフォメーション
作成日時 : 03/12/2021 (1.8.0)
* 本ページは、PyTorch 1.8 Tutorials の以下のページを翻訳した上で適宜、補足説明したものです:
- Learning PyTorch : Learn the Basics : Datasets and DataLoaders
* サンプルコードの動作確認はしておりますが、必要な場合には適宜、追加改変しています。
* ご自由にリンクを張って頂いてかまいませんが、sales-info@classcat.com までご一報いただけると嬉しいです。

- お住まいの地域に関係なく Web ブラウザからご参加頂けます。事前登録 が必要ですのでご注意ください。
- Windows PC のブラウザからご参加が可能です。スマートデバイスもご利用可能です。
| 人工知能研究開発支援 | 人工知能研修サービス | テレワーク & オンライン授業を支援 |
| PoC(概念実証)を失敗させないための支援 (本支援はセミナーに参加しアンケートに回答した方を対象としています。) | ||
◆ お問合せ : 本件に関するお問い合わせ先は下記までお願いいたします。
| 株式会社クラスキャット セールス・マーケティング本部 セールス・インフォメーション |
| E-Mail:sales-info@classcat.com ; WebSite: https://www.classcat.com/ ; Facebook |
PyTorch の学習 : 基本 – Dataset と DataLoader
データサンプルを処理するためのコードは乱雑で維持するのが困難になり得ます ; より良い可読性とモジュール性のために理想的にはデータセット・コードがモデル訓練コードから切り離されることを望みます。PyTorch は 2 つのデータ・プリミティブを提供します : torch.utils.data.DataLoader と torch.utils.data.Dataset です、これらは貴方自身のデータと事前ロードされたデータセットを利用することを可能にします。Dataset はサンプルと対応するラベルをストアし、そして DetaLoader はサンプルへの容易なアクセスを可能にするために Dataset 周りの iterable をラップします。
PyTorch ドメインライブラリは (FashionMNIST のような) 多くの事前ロードされたデータセットを提供します、これらは torch.utils.data.Dataset をサブクラス化して特定のデータに固有の関数を実装しています。それらは貴方のモデルをプロトタイプしてベンチマークするために利用できます。それらをここで見つけることができます : 画像データセット、テキスト・データセット そして 音声データセット。
データセットをロードする
Fashion-MNIST データセットを TorchVision からどのようにロードするかのサンプルがあります。Fashion-MNIST は 60,000 訓練サンプルと 10,000 テストサンプルから成る Zalando の品目の画像のデータセットです。各サンプルは 28×28 グレイスケール画像と 10 クラスの一つからの関連ラベルから成ります。
以下のパラメータで FashionMNIST Dataset をロードします :
- root は訓練/テストデータがストアされるところのパス、
- train は訓練かテストデータセットかを指定します、
- download=True はそれが root で利用可能でない場合にインターネットからデータをダウンロードします。
- transform と target_transform は特徴とラベル変換を指定します。
import torch
from torch.utils.data import Dataset
from torchvision import datasets
from torchvision.transforms import ToTensor, Lambda
import matplotlib.pyplot as plt


training_data = datasets.FashionMNIST(
    root="data",
    train=True,
    download=True,
    transform=ToTensor()
)

test_data = datasets.FashionMNIST(
    root="data",
    train=False,
    download=True,
    transform=ToTensor()
)
Downloading http://fashion-mnist.s3-website.eu-central-1.amazonaws.com/train-images-idx3-ubyte.gz to data/FashionMNIST/raw/train-images-idx3-ubyte.gz
Extracting data/FashionMNIST/raw/train-images-idx3-ubyte.gz to data/FashionMNIST/raw
Downloading http://fashion-mnist.s3-website.eu-central-1.amazonaws.com/train-labels-idx1-ubyte.gz to data/FashionMNIST/raw/train-labels-idx1-ubyte.gz
Extracting data/FashionMNIST/raw/train-labels-idx1-ubyte.gz to data/FashionMNIST/raw
Downloading http://fashion-mnist.s3-website.eu-central-1.amazonaws.com/t10k-images-idx3-ubyte.gz to data/FashionMNIST/raw/t10k-images-idx3-ubyte.gz
Extracting data/FashionMNIST/raw/t10k-images-idx3-ubyte.gz to data/FashionMNIST/raw
Downloading http://fashion-mnist.s3-website.eu-central-1.amazonaws.com/t10k-labels-idx1-ubyte.gz to data/FashionMNIST/raw/t10k-labels-idx1-ubyte.gz
Extracting data/FashionMNIST/raw/t10k-labels-idx1-ubyte.gz to data/FashionMNIST/raw
Processing...
Done!
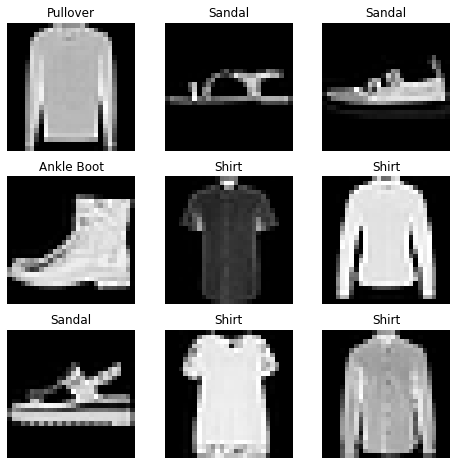
データセットを反復して可視化する
Dataset をリストのように手動でインデックスできます : training_data[index]。訓練データの幾つかのサンプルを可視化するために matplotlib を使用します。
labels_map = {
    0: "T-Shirt",
    1: "Trouser",
    2: "Pullover",
    3: "Dress",
    4: "Coat",
    5: "Sandal",
    6: "Shirt",
    7: "Sneaker",
    8: "Bag",
    9: "Ankle Boot",
}
figure = plt.figure(figsize=(8, 8))
cols, rows = 3, 3
for i in range(1, cols * rows + 1):
    sample_idx = torch.randint(len(training_data), size=(1,)).item()
    img, label = training_data[sample_idx]
    figure.add_subplot(rows, cols, i)
    plt.title(labels_map[label])
    plt.axis("off")
    plt.imshow(img.squeeze(), cmap="gray")
plt.show()
ファイルのためのカスタム Dataset を作成する
カスタム Dataset クラスは 3 つの関数を実装しなければなりません : __init__, __len__ と __getitem__ です。この実装を見ましょう ; FashionMNIST 画像はディレクトリ img_dir にストアされ、それらのラベルは CSV ファイル annotations_file に個別にストアされています。
次のセクションでは、これらの関数の各々で何が起きているかを分析します。
import os
import pandas as pd
from torchvision.io import read_image

class CustomImageDataset(Dataset):
    def __init__(self, annotations_file, img_dir, transform=None, target_transform=None):
        self.img_labels = pd.read_csv(annotations_file)
        self.img_dir = img_dir
        self.transform = transform
        self.target_transform = target_transform

    def __len__(self):
        return len(self.img_labels)

    def __getitem__(self, idx):
        img_path = os.path.join(self.img_dir, self.img_labels.iloc[idx, 0])
        image = read_image(img_path)
        label = self.img_labels.iloc[idx, 1]
        if self.transform:
            image = self.transform(image)
        if self.target_transform:
            label = self.target_transform(label)
        sample = {"image": image, "label": label}
        return sample
__init__
__init__ 関数は Dataset オブジェクトをインスタンス化するときに一度実行されます。画像を含むディレクトリ、アノテーション・ファイルと両者の transforms を初期化します (次のセクションで更に詳細にカバーされます)。
lavels.csv ファイルはこのように見えます :
tshirt1.jpg, 0
tshirt2.jpg, 0
......
ankleboot999.jpg, 9
def __init__(self, annotations_file, img_dir, transform=None, target_transform=None):
    self.img_labels = pd.read_csv(annotations_file)
    self.img_dir = img_dir
    self.transform = transform
    self.target_transform = target_transform
__len__
__len__ 関数はデータセットのサンプル数を返します。
例 :
def __len__(self):
    return len(self.img_labels)
__getitem__
__getitem__ 関数は与えられたインデックス idx でデータセットからサンプルをロードして返します。インデックスに基づいて、それはディスク上の画像の位置を識別し、それを read_image を使用して tensor に変換し、self.img_labels の csv データから対応するラベルを取得し、(適用可能であれば) それらの上で transform 関数を呼び出し、そして Python 辞書で tensor 画像と対応するラベルを返します。
def __getitem__(self, idx):
    img_path = os.path.join(self.img_dir, self.img_labels.iloc[idx, 0])
    image = read_image(img_path)
    label = self.img_labels.iloc[idx, 1]
    if self.transform:
        image = self.transform(image)
    if self.target_transform:
        label = self.target_transform(label)
    sample = {"image": image, "label": label}
    return sample
DetaLoader で訓練のためにデータを準備する
Dataset はデータセットの特徴とラベルを一度に 1 つのサンプル取得します。モデルを訓練する間、典型的にはサンプルを「ミニバッチ」で渡し、モデルの overfitting を減じるために総てのエポックでデータを再シャッフルし、そしてデータ取得をスピードアップするために Python のマルチプロセッシングを利用することを望みます。
DataLoader は容易な API でこの複雑さを抽象化する iterable です。
from torch.utils.data import DataLoader

train_dataloader = DataLoader(training_data, batch_size=64, shuffle=True)
test_dataloader = DataLoader(test_data, batch_size=64, shuffle=True)
DataLoader を通して iterate する
そのデータセットをデータローダにロードしましたので必要に応じてデータセットを通して iterate できます。下の各 iteration は train_features と train_labels のバッチを返します (batch_size=64 の特徴とラベルをそれぞれ含みます)。shuffle=True を指定しましたので、総てのバッチに渡り iterate した後、データはシャッフルされます (データロードの順序に渡る極め細かい制御については、Sampler を見てください)。
# Display image and label.
train_features, train_labels = next(iter(train_dataloader))
print(f"Feature batch shape: {train_features.size()}")
print(f"Labels batch shape: {train_labels.size()}")
img = train_features[0].squeeze()
label = train_labels[0]
plt.imshow(img, cmap="gray")
plt.show()
print(f"Label: {label}")
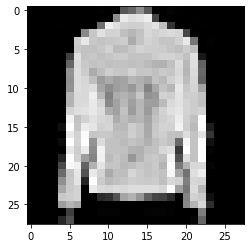
Feature batch shape: torch.Size([64, 1, 28, 28])
Labels batch shape: torch.Size([64])
Label: 4
以上